A fence project begins with a line on a plan, but the equipment decision depends on what will go into the ground. A steel T-post, a round pipe and a timber post have different profiles. The soil may change halfway across the property. A driver that fits one post may need a different sleeve for another, and a tool that works comfortably on open ground may be awkward beside an existing fence. Sorting out these details first makes the shopping decision much clearer.
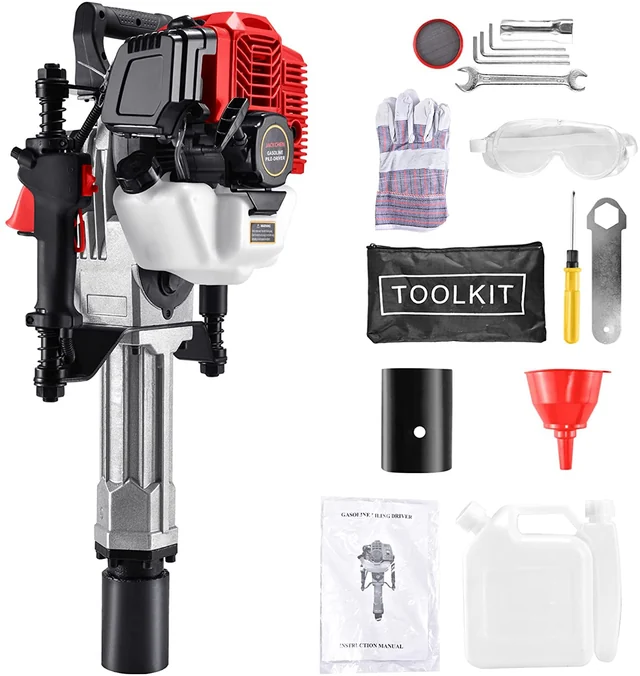
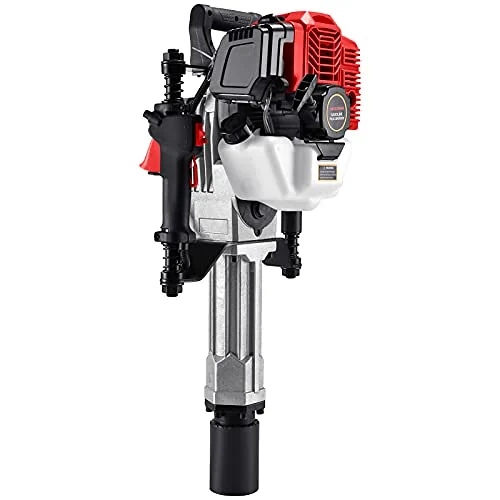
Our 52cc gas T-post driver brings the engine and driving assembly together in one tool. The selected configuration includes 55 mm and 70 mm sleeves. It is a two-stroke machine with a listed weight of 42 pounds, so fuel preparation, lifting and control deserve as much attention as the impact specification. This guide helps you decide whether that arrangement fits your project and what to check before ordering.
It is a planning guide, not the operating manual for your particular machine. Use the instructions supplied with the equipment for setup, fuel, maintenance and operation. For a fence that carries structural loads, supports a gate or sits on a boundary, settle the design and permission questions before choosing the driving tool.
Decide whether the post should be driven
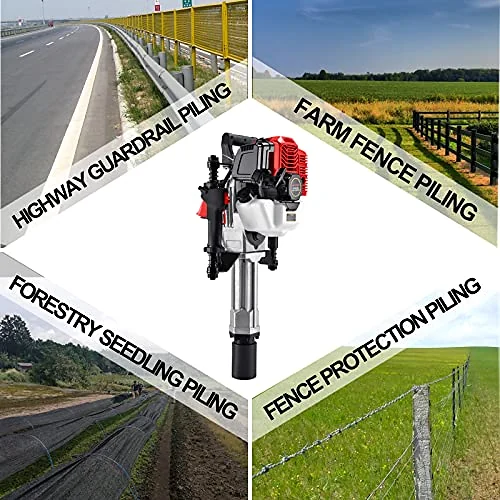
Driving and digging solve different installation problems. A driven post displaces the surrounding soil as it enters. An auger removes soil to create a hole, which may then need a specified backfill or concrete footing. You should not switch from one method to the other simply because one tool is available. The fence design, post type, ground and expected loads should determine the method.
For example, a line of compatible steel posts for a light fence presents a different task from a large timber gate support. The gate post must deal with weight and repeated movement. Its footing may need dimensions and construction that cannot be achieved by driving a post into the ground. If your plan specifies a dug footing, a post driver does not replace that requirement.
Write down the installation method for each type of post on the project. Separate line posts, corner posts, end posts and gate supports. This prevents a common purchasing mistake: choosing one machine for the longest section of fence and assuming it will handle every other support. A project can reasonably need more than one method without needing more than one powered tool purchase.
If holes are part of the plan, compare our earth auger bits and check the powerhead requirements. The 4-inch and 6-inch bits are attachments, not complete drilling machines. Their presence in the same range does not mean they connect to the post driver. The tool, connection and task must all agree.
Measure the actual post profile
The name printed on a post is not a complete fit measurement. A T-post has a shaped cross-section, often with protrusions that affect the space it needs inside a sleeve. A round post may have welds, coatings or an uneven end. A timber post may vary along its length. Measure the widest relevant part rather than relying on a nominal label alone.
The selected JACKCHEN driver comes with 55 mm and 70 mm sleeves. Those numbers identify the sleeve sizes; they are not a blanket approval for every post with a smaller advertised diameter. You still need the clearance, post type and attachment arrangement required by the equipment instructions. An accessory that just barely fits over the end may not be suitable for controlled driving.
Keep a short measurement record for the posts you intend to buy. Include shape, outside dimensions, coating and any features near the top. If you are replacing posts in an existing fence, measure those as well. Replacement material that looks similar from a distance can have a different profile or wall thickness, which can change both fit and the installation method.
Do not modify a sleeve, grind a post or improvise a connection to make two incompatible parts meet. If the fit is unclear, resolve it with the equipment and post supplier before use. A clear answer before ordering is more valuable than a collection of adapters that almost fit.
| Check | What to record | Why it matters |
|---|---|---|
| Post profile | T-shaped, round or another specified shape | The full profile must fit the approved sleeve |
| Outside dimensions | Measure the relevant widest section | Nominal sizes can miss protrusions or coatings |
| Post condition | Straightness, end shape and damage | Damaged material can complicate positioning |
| Sleeve connection | Exact fitting and retention method | Similar diameter does not prove compatibility |
| Installation design | Driven depth and support requirements | The tool must suit the planned fence system |
Assess the ground along the whole line
The ground beside the first post does not necessarily represent the rest of the fence. A route can cross loose soil, compacted access areas, roots, buried rubble and changes in moisture. A driver specification cannot describe those conditions for you. Walk the entire proposed line and identify areas that need a different approach before transporting equipment and posts to the site.
The selected JACKCHEN driver is not intended for rocky soil. Treat that limitation as part of the selection decision. Do not buy it on the assumption that a larger engine number or a higher impact figure will overcome every obstruction. A post that stops advancing may have met a condition that requires assessment, not more force.
Ground inspection also includes what cannot be seen. Arrange utility locating before driving posts or digging. In the United States, 811 guidance explains how to start that process. Follow the local requirements for notice, markings and working around services, and ask about privately installed lines that may need separate locating. A shallow-looking task can still reach a cable or pipe.
Mark uncertain areas on the project plan. An old building footprint, a former driveway or a patch of unexplained fill deserves attention. If the ground does not match the installation design, pause the tool decision until the method is settled. That is especially important when the fence must resist substantial loads or protect livestock.
Understand the two-stroke setup
A self-contained gas driver can move along a fence without a power cord or an external compressor. That mobility is useful on a long run or a site where electrical power is inconvenient. It also brings responsibilities for fuel, exhaust, storage and maintenance. Compare the complete working arrangement, not just whether the machine starts without an outlet.
The JACKCHEN 52cc model uses a two-stroke engine. Follow the exact fuel and oil instructions supplied with your machine and use suitable labeled containers. Do not transfer a mixture from another tool merely because both engines are two-stroke. Keep the machine's own instructions with the fuel supplies so the person preparing it can check the correct requirements.
Plan an outdoor operating area with adequate separation from people and enclosed spaces. Engine exhaust makes a gas-powered driver unsuitable for use inside a building or another poorly ventilated location. A garage doorway or open window is not a substitute for a suitable outdoor work area. The equipment manual should guide the operating conditions and required precautions.
Fuel handling should fit the work schedule. Allow the machine to cool as instructed before refueling, keep ignition sources away and address spills before restarting. Store fuel and equipment according to their instructions and local requirements. These are ordinary parts of owning a small engine, and they belong in the decision to buy one.
Read the specifications as separate facts
Engine displacement, impact energy, speed and weight answer different questions. Displacement describes the engine size. A listed impact figure describes a particular performance measure under the seller's stated conditions. Speed may refer to the engine rather than the number of useful driving blows. None of these numbers alone predicts how quickly your fence will be installed.
Our selected model is listed as 52cc with 55 joules of impact energy and a weight of 42 pounds. These figures help identify the configuration and compare the handling demands. They do not establish a guaranteed time per post, a maximum depth in every soil or a promise that any post can be driven. The post, attachment, ground and operator all affect the work.
Be cautious when comparing specifications across brands. Two manufacturers may describe speed or impact differently, and a product title may combine several measurements without explaining their test conditions. Favor an exact model specification and operating manual over a long title. If an important comparison depends on a measurement that is unclear, ask for clarification before relying on it.
For your own project, the most useful comparison may be practical rather than numerical. Can the tool reach the site? Can you handle its weight in the required position? Does the correct sleeve exist? Can you maintain it? Those questions often narrow the choice more effectively than sorting products by the largest power figure.
Plan how the tool will be handled
Forty-two pounds is a meaningful load, particularly when the tool must be lifted onto a post and moved repeatedly. Think through the complete motion: taking the machine from storage, loading it, carrying it to the fence, positioning it and putting it down between locations. A comfortable lift from a bench does not reproduce every part of a field installation.
The driver has handles around the assembly, but handles do not remove the effects of weight, vibration or awkward positioning. Follow the manufacturer's requirements for handling, stance and assistance. If the post height forces an unstable position, change the work arrangement or equipment choice. Do not improvise a platform simply to make a heavy tool reach farther.
Access also matters. A narrow gate, soft path or steep section can make moving the equipment harder than the driving itself. Place supplies so that the route remains clear and the machine can be set down as instructed. Keep unnecessary people away from the working area and avoid carrying the tool through clutter while also managing loose accessories.
Plan manageable work periods and a realistic pace. A powered tool may reduce one kind of effort while adding noise, vibration and handling demands. Appropriate protective equipment, breaks and a controlled work area should be part of the plan from the beginning. There is no useful productivity gain in continuing when control or concentration is slipping.
Know what an additional socket changes
Our 100 mm threaded socket is listed for compatible JACKCHEN JC-70 drivers with the matching threaded structure. It has a larger opening than the included sleeves. That makes connection and post measurement important checks, but the opening alone does not establish that the driver is suitable for every larger post or every installation.
Check the threaded arrangement on the actual machine before ordering. Model families can include configurations with different connections, and a familiar appearance does not prove that a part will attach correctly. Compare the specified socket dimensions, connection and intended use. Keep any written compatibility confirmation with the order record so it is available when the part arrives.
A larger socket also changes the space around the post. The required fit must still support the intended driving method. Do not assume that more clearance is always better, or that a loose fit can be corrected with improvised packing. Use the arrangement permitted by the equipment instructions and stop if the attachment will not secure normally.
Treat accessories as part of a system. The driver, socket, post and installation method must work together. Buying the largest socket in the range is not a substitute for knowing the post dimensions. If the original sleeves already match the planned posts, an additional socket may have no useful role on that project.
Organize the fence project before delivery
Create a simple equipment sheet before the order arrives. List the selected driver, included sleeves, any additional approved attachment, protective equipment and the documents needed for the installation. Keep fuel requirements and maintenance items on a separate line so they are not confused with parts included in the box. This sheet becomes a useful receiving checklist.
Lay out the project in sections that make sense for access and material handling. Identify where posts can be stored without blocking the route, where the equipment can cool safely and where you will stop if the weather changes. Long straight lines can make a project look simple on paper while hiding difficult corners, slopes or transitions.
Set the fence alignment and location through the appropriate survey, boundary and design process. A power tool cannot correct an uncertain property line. Where local permissions or utility clearances apply, complete those steps before installation. Keep the approved plan accessible rather than relying on a sequence of temporary marks that may be disturbed.
If several people are involved, agree on responsibilities. One person should not move a post while another assumes it is ready for driving. Clear communication, a controlled area and the operating procedure in the manual matter more than rushing from one location to the next. Avoid making a first-time operator learn the tool while also solving the fence layout.
Inspect the delivered configuration
When the driver arrives, compare the model and contents with the selected offer and your equipment sheet. Check the machine, handles, attachments and visible fittings for damage before preparing it for operation. Keep packaging and order information until you have completed the checks that the purchase terms allow. Photograph an issue if you need to document it for order support.
Read the manual before assuming the tool is ready to run. Some preparation requirements are easy to miss when a product arrives largely assembled. Follow the supplied instructions for initial inspection, fuel, lubrication and fastening. Do not add fluids or grease simply because another machine required them; unnecessary additions can create their own problems.
Check each sleeve or socket against the posts without powering the tool. Confirm the fit and retention as instructed. If a component appears damaged, mismatched or incomplete, resolve that issue through the order's support options before use. A trial under power is not an appropriate way to settle an obvious fitting problem.
The purchase page is also the place to confirm current delivery, returns and included items. Our catalog helps you compare the selected configuration, while the final offer governs the transaction. Keep the order confirmation and the exact model details together so later accessory and service questions can be answered accurately.
Compare buying, renting and another method
Ownership makes more sense when the tool fits repeated projects and you have a suitable place to store and maintain it. A one-time fence may still justify a purchase, but include the accessories, fuel supplies, handling arrangements and time needed to learn the equipment. The advertised price is only part of that decision.
Rental can be useful when a project needs a different class of equipment or when you want local advice about a particular installation. Ask what is included, which post types are approved, how damage is handled and what transport is required. Compare the complete rental arrangement with the complete purchase arrangement rather than comparing two headline prices.
Hiring a contractor may be the better fit when the site, loads or boundary questions are complicated. The difficult part of a fence is not always placing the line posts. Corners, gates, changes in grade and unsuitable ground can determine whether the finished fence works as intended. Choose the method that addresses those parts of the project.
For a mixed project, you may decide to own an accessory or a smaller tool and hire help for the demanding sections. There is no requirement to make one purchase cover every stage. A clear division of tasks can produce a more realistic budget and a better match between equipment and work.
Keep a useful maintenance record
Save the model information, purchase record and manual in one place. Record maintenance when it is performed, using the schedule and materials required by the manufacturer. A short dated note is enough to distinguish a checked item from something you only intended to inspect. This becomes especially useful when a tool sits unused between seasonal projects.
Inspect the equipment before the next project rather than assuming its condition is unchanged. Storage, transport and the previous work can affect fittings and accessories. Look for damage, abnormal wear or missing parts and follow the manual's inspection procedure. If something has changed, address it before bringing the tool to the fence line.
Keep compatible accessories identified. A sleeve or socket stored loose beside similar parts can be difficult to recognize later. Label the storage location with the model and connection, without covering any markings on the part. This small step helps prevent an accidental mismatch when several tools share a workshop.
When you finish the project, follow the prescribed shutdown and storage procedure. Clean and store the machine as directed, keep fuel handled appropriately and leave the next user a clear record of any issue. Good records do not increase the tool's rated capacity, but they make it easier to use the correct equipment in the correct condition.
Make a one-page project record
Keep the decisions in a form you can use outside the workshop. A one-page record can list the post types, measurements, approved installation method, selected sleeve and locations that need extra assessment. Add the equipment model and the source of any compatibility confirmation. This is more useful on delivery day than a folder of unrelated product screenshots.
Use that record to check changes to the project. If a supplier substitutes a different post, compare its profile before accepting that the original sleeve choice still applies. If the fence route moves, revisit the ground and service checks for the new line. A small change in the shopping list or site layout can affect the equipment decision without changing the overall purpose of the fence.
Keep unresolved questions visible rather than filling the gaps with assumptions. A note such as “confirm threaded connection” gives the seller a specific issue to answer. Once it is resolved, record the exact model and answer. The document does not need to be elaborate; it needs to distinguish what has been checked from what still requires attention.
Your final selection check
Before ordering, confirm that the planned posts are intended to be driven, the sleeve and connection match, the ground is suitable and the handling demands are realistic. Check the specific model and included components once more in the purchase tab. These decisions are more useful than an unsupported promise about how many posts a machine can install in an hour.
The JACKCHEN post-driver collection brings the selected 52cc machine and threaded socket together for comparison. If your work also includes removing a hard surface, read our concrete-saw planning guide before choosing the cutting setup. Start with the task, settle the fit, and buy the configuration that your project actually requires.